Before starting any work on the wall, turn off the electricity and use masking tape to frame the area where the stucco will be removed. Also, be sure to ventilate the space to reduce dust and debris.
Blistering can be a sign that moisture is penetrating the walls and causing damage to the structure. It is important to repair this problem immediately before washing the stucco. For more information visit Stucco Philadelphia.
Loose stucco can cause various problems, from water penetration to efflorescence. When it is properly removed and repaired, these problems are minimized. This project is not an easy task and requires a lot of time and patience, but if done correctly, the results are well worth it. Before starting the stucco removal process, it is a good idea to select a hidden spot and practice the technique. This will allow you to get a feel for how the project will progress and help prevent you from leaving a large glaring area of your home exposed. It is also a good idea to make sure you have all of the necessary materials before you begin.
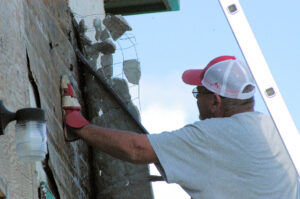
Start by hammering lightly in a hidden area to break up and loosen the stucco from the brick. Once you have a small area of the wall loose, use a hammer and chisel to remove any loosened stucco. Once the loosened stucco is removed, it is important to inspect the underlying brick and mortar for any signs of moisture damage. You can do this by pressing your palms against the wall to check for springiness. If you notice any spongy areas, then the stucco needs to be removed.
Once you have a small section of the stucco loose, it is a good idea to use a wire brush to remove any remaining debris and dirt from the surface. This will help prevent moisture from entering the wall in the future and will make it easier to clean when needed. Once the wall is dirt-free, take a masonry saw and set the blade depth at about 1/4 an inch. Use the first set of lines you drew with chalk to guide your cuts. After the first cut, increase the blade depth another 1/4 an inch and repeat the process until you reach the metal lath.
If you are removing the stucco to replace a damaged or rotted mudsill, be sure to keep the cutline six in. lower than the existing mudsill. This will preserve the wire mesh below the mudsill and give you something to attach your new stucco to.
Blistering in stucco is often caused by water getting behind the finish. As the water evaporates, it can leave behind salts that expand and blister the stucco. This can be a sign of water damage that requires a professional to investigate and address.
To test the integrity of a stucco surface, gently tap on the wall with a hammer or your knuckles. If the sound is hollow or doesn’t produce a solid thud, it may indicate that the stucco is loose and needs to be removed. You can also scrape the stucco to see how easily it comes off the wall. If the stucco flakes or crumbles, it is well-bonded, and the removal process should be straightforward.
Stucco repairs like fixing cracks, patching holes, and resurfacing can make your home or business look new again. However, at some point, you will likely need to consider full or partial stucco replacement to ensure the long-term health and beauty of your exterior walls.
Early detection of stucco problems can help you avoid costly repair bills. Watch out for key warning signs of deterioration, including staining, blistering, and efflorescence.
Ai Restoration works with homeowners and property managers to assess the condition of their stucco walls, identify the source of any damage, and provide expert repair and maintenance services. Contact us today to learn more about our stucco repair services and schedule your free consultation!
Stucco is a beautiful, durable material that can add character and value to your property. However, as with any exterior material, it will eventually need to be repaired or replaced. If you notice cracking, chipping, or bubbling, it is important to take immediate action to prevent further damage and protect your investment. To do this, it is essential to understand what causes these problems so that you can make the necessary repairs. Common stucco repairs include fixing cracks, patching holes, and removing blisters. If left untreated, these issues can lead to structural damage and costly repairs. To avoid these issues, use high-quality materials, follow proper installation procedures, and watch for early warning signs of deterioration.
When a stucco remediation project starts, workers will lay out tarps and erect scaffolding to protect nearby surfaces. They will then use a hammer and chisel or crowbar to remove loose stucco sections, eliminating any nails caught in the wall. Then, they will reassess the worksite. If the brick beneath the stucco is damaged, a contractor may need to dig down and repair it before adding it again.
Next, the workers will check for rotting and mold or mildew. They will also ensure that windows and doors are in good condition before reinstalling them. If the walls are found to be leaking, contractors will remove any water-soaked sheathing or plywood and perform any necessary structural repairs before replastering.
Moisture damage is the most common reason for stucco failure. It happens when water seeps into cracks and holes in the stucco, causing the material to become soft and eventually rot or rust. Some things, including leaks in the home, foundation problems, or poor site grading, can cause the damage.
To prevent moisture damage, homeowners should reseal the perimeter of their homes and install downspouts, gutters, or flashing to redirect rainwater away from the building. A reputable stucco repair company can help, but the homeowner can also do their part by maintaining the home’s exterior. A good maintenance plan includes spraying the stucco with a hose regularly to remove dirt and debris from the surface and periodically re-caulking areas around doors, windows, and baseboards.
In addition, a re-painting job should be done every few years to keep the color fresh and reduce the likelihood of moisture penetration. Finally, it is important to have a professional complete a wood-destroying organism (WDO) inspection and an infrared scan periodically to prevent pests from entering the home through unsealed openings. This prevents a costly and time-consuming pest control job and saves money in the long run. This type of service is often included in a comprehensive maintenance contract with a reputable repair company.
Stucco removal is often performed to address moisture issues in homes and commercial buildings. Moisture problems that are left unaddressed can cause serious structural damage, which in turn can be extremely costly to repair. However, homeowners may also choose to have stucco removed for various other reasons. Some might want to change the look of their home, while others could be dealing with a leaky wall or ceiling.
When you decide to remove stucco, it’s important to ask your contractor about their process. You want to make sure they’re going to address the underlying issue in the most effective way possible. This will help prevent future moisture issues and costly repairs down the line.
A contractor will start by carefully preparing the walls for stripping. This includes using drop cloths and plastic sheets to protect the floor and walls from dust and debris as they work. In addition, they should also use a stiff-bristle brush to remove loose pieces of stucco and dirt from the surface of the wall before starting the actual removal process.
Next, the wire mesh used to support the stucco must be removed. This can be done by prying a mesh section away from the wall and pulling it out. If nails are attached to the wire mesh, they will need to be removed as well. Lastly, the putty knife can scrape off any remaining bits of stucco that aren’t easily pulled off.
Once the stucco has been removed, it’s important to test the wall for moisture and any damage. Depending on the situation, it may be necessary to replace any damaged drywall or insulation and install a new vapor barrier.
In addition, you should ask your contractor about the best way to prevent moisture from causing further problems. This might include recommending the installation of a weep screed or suggesting a better drainage system for your home. The right solution can prevent moisture problems and protect your investment.